Building a Home AI Inference Node, Part 2: Adding llama.cpp and Going From Chat Server to Research Workstation
Part 1 made the node stable. Part 2 makes it useful for research: adding llama.cpp as a second runtime, GGUF model control, and the OpenAI-compatible API that ties it together.
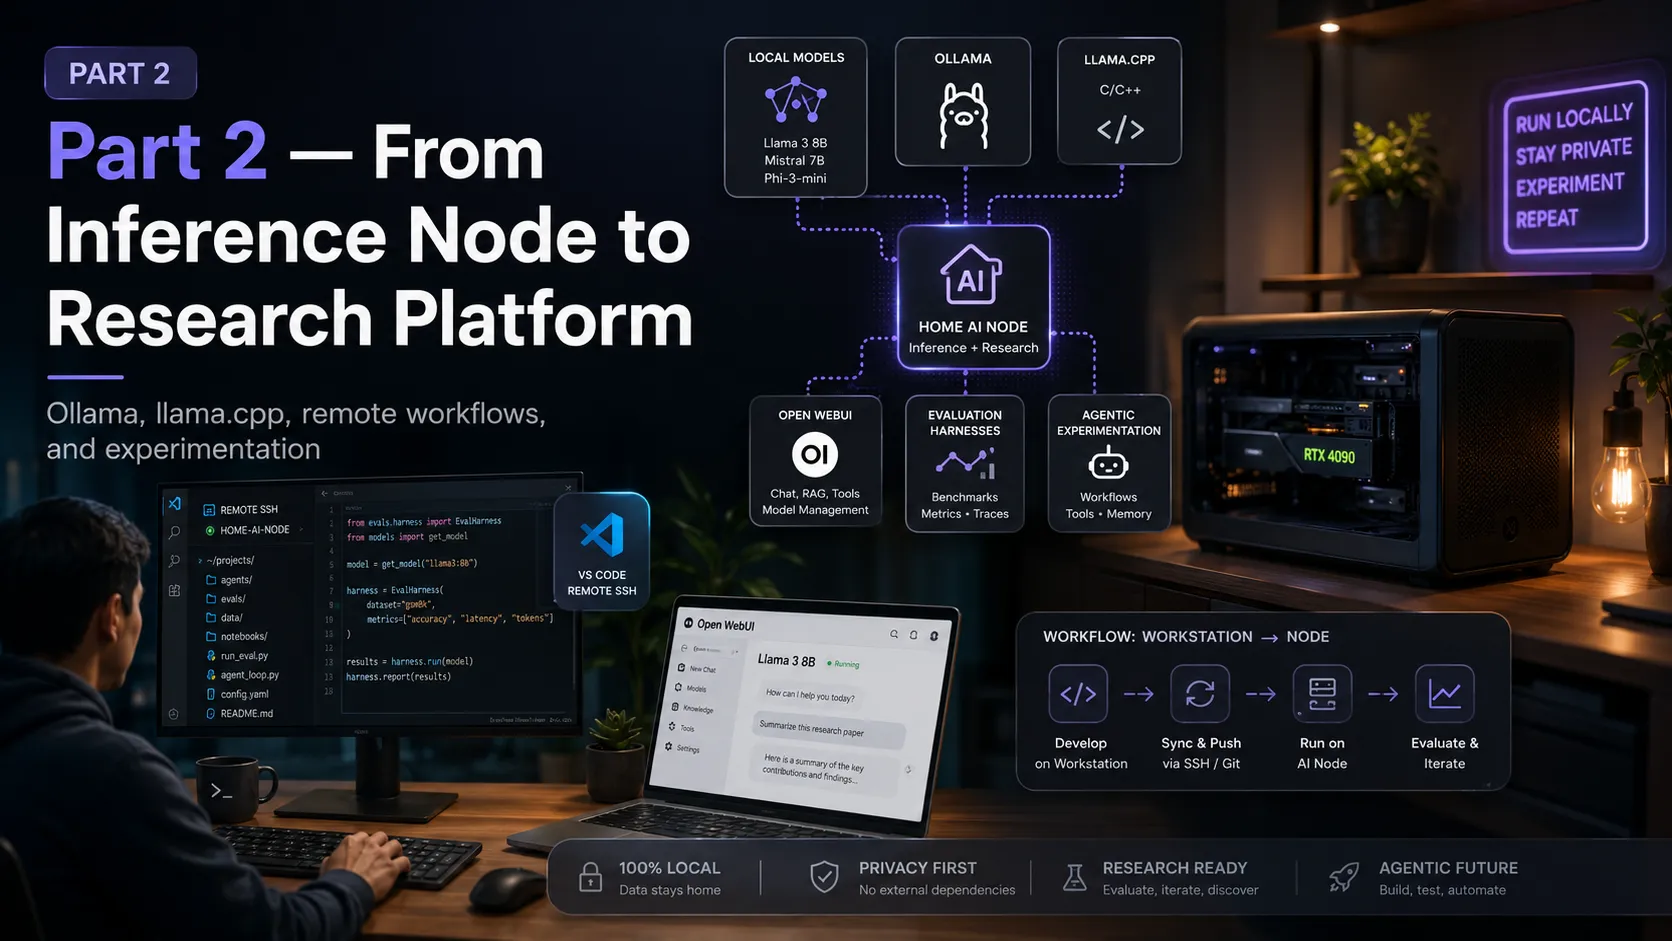
Part 1 was about getting the infrastructure stable: WSL, Ollama, OpenWebUI, Windows networking, the dual-identity trap, and startup automation. By the end of that, the node was persistent and LAN-accessible:
MacBook
  ↓
192.168.1.201 (Windows desktop)
  ↓
WSL Ubuntu
  ↓
Ollama + OpenWebUI
  ↓
RTX 3060 Ti
That’s useful, but it’s still mostly a convenience stack. For research (benchmarking, model comparison, adversarial evaluation), I need more control than Ollama alone provides. That’s what Part 2 is about.
A note on extractability, same as Part 1. The diagrams show my specific setup (Windows desktop + MacBook client), but the body uses “client” generically, since VS Code Remote SSH and the OpenSSH config syntax are identical across macOS, Linux, and Windows. If you’re running everything on a single Windows PC, the llama.cpp build, GCC pinning, systemd service, and OpenAI-compatible API sections all still apply directly. The remote dev workflow section is the only part that assumes two machines, and the same SSH config block works unchanged on whichever client OS you happen to be using.
Why add llama.cpp when Ollama already works?
Ollama is excellent for what it does. Pull a model, run it, get an API endpoint, skip thinking about runtime internals. That’s exactly why I started with it.
But Ollama abstracts away details I care about for research:
- Which exact GGUF file is being served
- What quantization level, and what the tradeoffs actually are
- GPU offload: how many layers, and what happens when you change that
- Context size behavior
- Server flags and their effects on output quality and latency
llama.cpp exposes all of this. The way I think about the three:
Ollama     = convenience runtime  (fastest path to a working model)
llama.cpp  = control runtime      (explicit flags, measurable behavior)
OpenWebUI  = interaction layer    (browser UI, sits on top of either)
I want all three. The distinction between a chat server and a research workstation is whether you can change the conditions of an experiment and measure what happens.
What llama.cpp adds
With llama.cpp I can run something like:
llama-server \
  -m /path/to/model.gguf \
  --host 0.0.0.0 \
  --port 8080 \
  -ngl 99 \
  -c 4096
The specific command matters less than what it represents: I can now ask questions that Ollama doesn’t easily answer.
- What happens if I change context size from 2048 to 8192?
- What happens if I drop GPU offload from 99 layers to 32?
- How does Q4_0 quantization compare to Q5_K_M on the same prompt?
- How does this model’s behavior differ between Ollama and llama.cpp serving the same GGUF?
On an RTX 3060 Ti with 8GB VRAM, those questions matter. The VRAM ceiling is real: quantization, context length, and layer offload choices can mean the difference between a model running smoothly or thrashing. Being able to tune these explicitly is what makes the node feel like a workstation rather than a black box.
Setting up model storage
Before building llama.cpp, I created a dedicated directory for GGUF model files. Keeping models outside the home directory and under a stable path makes them easier to reference consistently in service files and eval scripts:
sudo mkdir -p /srv/llm/models
sudo chown -R ai:ai /srv/llm
GGUF files live here, pulled from Hugging Face or converted from other formats. This becomes the canonical model path that service files and scripts reference.
Building llama.cpp with CUDA support
llama.cpp has no install script equivalent to Ollama’s one-liner. Inside WSL Ubuntu, the path is to build from source with CUDA explicitly enabled:
sudo apt update
sudo apt install -y git cmake build-essential

git clone https://github.com/ggml-org/llama.cpp
cd llama.cpp

cmake -B build \
  -DGGML_CUDA=ON \
  -DCMAKE_BUILD_TYPE=Release

cmake --build build --config Release -j"$(nproc)"
-DGGML_CUDA=ON is the flag that matters. Without it, llama.cpp builds and runs but falls back to CPU with no GPU acceleration. Recent versions log a warning at startup if no usable GPU is found (warning: no usable GPU found, --gpu-layers option will be ignored), so it’s not actually silent, but it’s still easy to miss if you don’t read the startup output. The binary ends up at build/bin/llama-server.
When the CUDA build failed
The first build attempt hit an nvcc internal compiler error, a segfault inside the compiler while compiling ggml-cuda/mmvf.cu. Not a code bug; a toolchain compatibility problem.
GPU builds in WSL are sensitive to the exact combination of:
WSL Ubuntu version
NVIDIA Windows driver
CUDA toolkit version
GCC/G++ version
CMake flags
llama.cpp commit
Any of those being slightly misaligned can produce an nvcc crash with no useful error message. The fix was to pin GCC and G++ to version 11 (CUDA toolkits typically lag behind the newest GCC, and version 11 has broad compatibility with the CUDA 12 series I was using) and pass the compiler paths explicitly:
sudo apt install -y gcc-11 g++-11

rm -rf build

cmake -B build \
  -DGGML_CUDA=ON \
  -DCMAKE_BUILD_TYPE=Release \
  -DCMAKE_C_COMPILER=/usr/bin/gcc-11 \
  -DCMAKE_CXX_COMPILER=/usr/bin/g++-11

cmake --build build --config Release -j"$(nproc)"
That completed cleanly. The lesson is the same as the networking bugs in Part 1: treat it as a toolchain problem, not an application problem. Once the compiler versions are aligned with the CUDA toolkit, the build itself is straightforward.
Making llama-server persistent
Running llama-server from a terminal isn’t infrastructure. It stops when the session closes. Same approach as Ollama in Part 1: a systemd service.
The service file at /etc/systemd/system/llama-server.service:
[Unit]
Description=llama.cpp server
After=network.target

[Service]
User=ai
WorkingDirectory=/home/ai/llama.cpp
ExecStart=/home/ai/llama.cpp/build/bin/llama-server \
  -m /srv/llm/models/gemma-3-1b-it-Q4_K_M.gguf \
  --host 0.0.0.0 \
  --port 8080 \
  -ngl 999
Restart=always
RestartSec=5

[Install]
WantedBy=multi-user.target
sudo systemctl daemon-reload
sudo systemctl enable llama-server
sudo systemctl start llama-server--host 0.0.0.0 and -ngl 999 are the two flags that matter most here: the first makes it reachable over LAN, the second puts all layers on the GPU. Everything else is per-experiment.
Verifying the setup
The process check:
ss -tlnp | grep 8080
# LISTEN 0 512 0.0.0.0:8080  ...  llama-server
Health check:
curl http://localhost:8080/health
# {"status":"ok"}
Models endpoint:
curl http://localhost:8080/v1/modelsIt returned a Gemma 3 1B GGUF: small, fast, and a good starting point for verifying the serving path before loading anything larger.
Testing the OpenAI-compatible API
The more important test is whether the chat completions endpoint actually works:
curl http://localhost:8080/v1/chat/completions \
  -H "Content-Type: application/json" \
  -d '{
    "messages": [{"role": "user", "content": "Say hello in one short sentence."}],
    "temperature": 0.7,
    "max_tokens": 64
  }'
Response:
{
  "choices": [{
    "finish_reason": "stop",
    "message": {"role": "assistant", "content": "Hello there!"}
  }]
}
That OpenAI-compatible interface is what makes llama.cpp pluggable into anything built against the OpenAI API format: eval scripts, LangChain, custom tooling, OpenWebUI itself. From the Mac, the same endpoint is reachable at http://192.168.1.201:8080.
The node now has two independent model-serving paths reachable over LAN:
Ollama:     http://192.168.1.201:11434  (Ollama API)
llama.cpp:  http://192.168.1.201:8080   (OpenAI-compatible)
OpenWebUI:  http://192.168.1.201:3000   (browser UI)
A small debugging note: the gzip message
When I first hit the llama.cpp root endpoint with plain curl:
curl http://localhost:8080
# Error: gzip is not supported by this browser
That looks alarming. It isn’t. The root endpoint serves a browser UI that curl doesn’t handle gracefully. The actual API endpoints work fine:
curl http://localhost:8080/health      # ok
curl http://localhost:8080/v1/models   # lists loaded model
Worth mentioning because it’s easy to misread as a server error when you’re first setting things up.
Remote development workflow
Once the node was reachable over LAN, I set up VS Code Remote SSH from the MacBook directly into the WSL Ubuntu environment on the desktop. The client stays the daily driver: editor, browser, everything else. The desktop provides the GPU-backed Linux runtime. VS Code bridges them transparently. The same setup works from any client OS, since VS Code Remote SSH and the OpenSSH client config syntax below are identical on macOS, Linux, and Windows (Windows OpenSSH reads C:\Users\<user>\.ssh\config).
The workflow:
client → VS Code Remote SSH → WSL Ubuntu → Ollama / llama.cpp → RTX 3060 TiThe ~/.ssh/config entry on the client:
Host home-ai-node
    HostName 192.168.1.201
    User ai
    Port 2222
    ServerAliveInterval 60
    ServerAliveCountMax 5
Port 2222, not 22. Windows can run its own OpenSSH Server, which is an optional Windows feature (not installed by default on Windows 10 or 11, though it ships installed on Windows Server 2025). If you’ve installed and enabled it, it binds to port 22, and WSL can’t also bind there. The fix is to run the WSL sshd on a different port and point VS Code at that. Port 2222 is the conventional choice.
ServerAliveInterval and ServerAliveCountMax matter too. Without them, the SSH connection drops when the session goes idle. With them, the client sends keepalives every 60 seconds and tolerates up to 5 missed responses before giving up.
After connecting, a quick verification that the environment is what it should be:
whoami               # ai
pwd                  # /home/ai/...
uname -a             # Linux ... WSL2
cat /etc/os-release  # Ubuntu
nvidia-smi           # RTX 3060 Ti visible
curl http://localhost:11434/api/tags  # Ollama model list
When all six return expected output, the session is confirmed: right user, right host, Linux on WSL, GPU visible, inference runtime live. From here, I can open terminals, edit files, run eval scripts, and inspect model behavior, all from the client, all executing on the desktop’s GPU.
This is what actually turns the node into a workstation. Without remote access, you’re walking over to the desktop to run experiments. With it, the desktop is just compute, and the client is where the work happens.
How this supports research
The reason I want multiple runtimes isn’t performance curiosity. Research requires changing one variable at a time and measuring what happens.
With the current setup, I can run the same prompt against:
- Ollama serving llama3
- llama.cpp serving a Gemma GGUF at Q4_0
- llama.cpp serving the same model at Q5_K_M
- Any other GGUF I pull down
And compare: output content, latency, token counts, behavioral differences, failure modes.
That’s the foundation for serious local evaluation work: prompt test suites, refusal behavior comparisons across runtimes and quantization levels, regression tests for model safety properties. A local node means I control the conditions. No API rate limits, no round-trip latency, no runtime behavior I can’t inspect. The experiment is reproducible because I own the stack end to end.
Final state
At the end of Part 2, the node looks like this:
MacBook
  ├── VS Code Remote SSH → WSL Ubuntu (dev workflow)
  └── LAN → 192.168.1.201
               ├── :3000   OpenWebUI    (browser UI)
               ├── :11434  Ollama       (convenience runtime)
               └── :8080   llama.cpp    (control runtime)
                            ↓
                        WSL Ubuntu
                            ↓
                        RTX 3060 Ti
Part 1 made the machine reachable and persistent. Part 2 made it multi-runtime, controllable, and remotely accessible as a proper development environment.
The next step is measurement: benchmarking scripts, prompt suites, runtime comparison logs, and eventually evaluation harnesses for responsible AI testing. That’s where the setup starts earning its keep as research infrastructure rather than just a well-configured home lab.
What’s deliberately not in this stack yet
A few tools came up naturally as I was building this and got deferred. Worth saying why.
vLLM is a powerful serving engine but solves a different problem:
Ollama     = convenience
llama.cpp  = local control and GGUF experimentation
vLLM       = production-style high-throughput serving
vLLM is worth reaching for when the goal is concurrent users, batched requests, maximizing throughput, or production-scale deployment. That’s not the goal on an 8GB GPU running single-user experiments. It’s on the roadmap once the local research workstation is stable.
Unsloth fits the training layer, not the serving layer. On a 3060 Ti, the realistic fine-tuning path is QLoRA on 7B models: adapter-based workflows, compact datasets, then export back into the serving stack. That’s genuinely useful for research, but it comes after the serving and evaluation stack is stable. Adding training infrastructure too early makes the whole setup harder to reason about.
The rough sequencing I’m working toward:
Part 1  —  Infrastructure
Part 2  —  Multi-runtime local inference
Part 3  —  Benchmarking and eval harnesses
Part 4  —  Production-style serving with vLLM
Part 5  —  Fine-tuning and training workflows
Part 3 will cover benchmarking and building the first eval harnesses on top of this stack.
Stay in the loop
New posts on AI security, responsible AI evaluation, and agentic systems — no noise, no cadence pressure. When there's something worth reading, it lands in your inbox.